Interesting to note—CNET reported that OpenSea, the largest NFT marketplace, now observes more than 250,000 people trading NFTs each month. Consequently, you can make a profit from your own NFT, but first, you have to create it.
Curious about non-fungible tokens (NFTs)? Want to create your own NFT with the help of a leading company in this space—Enjin? If your answer is yes in both cases, you are on the right page.
This article covers NFTs in great detail. You will see what they are, how they work, and how to create an NFT on Enjin. Let’s begin with defining NFT.
In this post:
What Is an NFT?

NFT stands for non-fungible tokens (NFTs), types of digital tokens that are not interchangeable or fungible. So you may ask what the fungibility of an asset is. Let’s make it simple; fungibility is like-for-like interchangeability.
Take a hundred-dollar bill, for example. You can exchange a hundred-dollar bill with ten ten-dollar bills and still hold the same value. So the dollar bills are fungible or interchangeable.
Regarding cryptocurrency, the same holds for Bitcoin (BTC) and Ethereum (ETH) you may have stored in two separate crypto wallets. If you swap your Bitcoin from one wallet with an equal value of Ethereum from the other wallet, you will still have the same value attached to both crypto wallets.
In contrast, you cannot do the same with non-fungible tokens. Each of these tokens has a unique ID and proof of ownership attached digitally. Due to this uniqueness, no two NFTs are the same, and you cannot swap one for the other while holding the same value.
As non-fungible tokens carry a secured record of digital ownership through hash or smart contracts, many users now opt to use NFTs to trade or sell their digital art, such as drawings, music, or magazines. Let’s check out some widespread and growing use cases of NFTs.
How Are Non-Fungible Tokens Used?

The entire blockchain world stared in awe when Jack Dorsey, Twitter's founder, sold his first tweet in the form of a non-fungible token for $2.9 million. This particular event fueled the global NFT hype to a great extent. Even individuals and organizations outside the blockchain industry are now considering using NFTs in their businesses or transactions.
But how exactly can you do that? Here are the main examples of NFT use cases:
Securing Digital Assets
Non-fungible tokens can maintain an accurate record of ownership transfer for digital items. In particular, digital assets that need to be differentiated from each other can now use NFTs to protect ownership.
NFTs can be linked to digital items such as virtual land, a piece of art, an in-game avatar, or a digital painting and act as their proof of ownership. Owners who secure their digital assets through NFTs will get peace of mind knowing their investments will remain safe from theft or fraudulence. Even if someone steals artwork protected by NFTs, they cannot replicate the ownership record and unique attributes.
Gaming
For many years, games have contributed to the growth of virtual economies. Players collect treasured items within the game to progress through levels and stages. With the introduction of the metaverse, gaming collectibles are now more relevant than ever.
Blockchain gaming now allows players to securely collect, trade, and store in-game NFTs or digital items by using fiat money or cryptocurrencies as a medium of exchange. At the same time, ownership of in-game NFT-based collectibles often gives players access to participate in the game's future development.
CryptoKitties, an online game, initiated this trend back in 2017. In this game, users collect and “breed” virtual cats or kittens, each having unique characteristics. The cats differ in their background colors, facial expressions, fur design, and skin colors.
Profiting from Trades
NFT creators receive a percentage from all future trading of an NFT, even on trading happening in the secondary market. This has unleashed an enormous potential for NFTs as a medium of trade to protect the intellectual properties of digital artworks. NFT creators can now benefit from trading without intermediaries, as all the ownership data is publicly available for anyone to validate.
Using Them as Collectibles
Collectors often value their collectibles based on the scarcity and uniqueness of the items. Interestingly, non-fungible tokens are not only unique but also theft-proof. Besides, collectors can also display their treasured NFT artworks publicly in the form of avatars or profile pictures.
Thus, collectors now have valid reasons to own an NFT or invest in NFT projects. In 2021, NFT collectibles registered total sales of $8.6 billion, a sharp rise from the previous year’s $10 million.
Now that we know the use cases of NFTs, let’s explore how to create an NFT.
How to Create Your Own NFT
Creating an NFT involves several steps, from creating a digital item to enlisting it in an NFT marketplace, which is known as minting NFTs. Finally, you can implement the NFT in a blockchain project like Enjin.
Now, we will show you the whole process in a step-by-step guide.
1. Create Your Digital Item
The first step of creating an NFT is to make the item that the NFT will represent. Typically, NFTs represent a digital item such as a painting, music, an art piece, an in-game collectible, a GIF, a social media post, or anything else. You will be the sole owner of the item. The scarcity or uniqueness will create a value for your item.
While making NFTs out of your digital item, you must ensure you own the absolute intellectual right to that item. Otherwise, you may end up with legal problems.
So, we are assuming you already own the item and have decided to create an NFT out of it. Let’s move on to the next step—picking the blockchain technology for your NFT for minting.
2. Choose Your Blockchain Technology
Ethereum is the most popular blockchain technology globally, and many NFT artists and creators prefer it over other technologies. However, Ethereum is not your only option. You can also opt for Polkadot, Cosmos, Binance Smart Chain, or Tezos.
This article shows the implementation of NFTs on Enjin, a large blockchain project with its own token, wallet, and marketplace. Enjin supports Ethereum as its network and provides the necessary software support to work with it. Developers can then create and manage virtual goods on the Ethereum blockchain.
Thus, we recommend you choose Ethereum as your preferred blockchain technology for this project. If you have little or no experience with blockchain, go with Ethereum without second thoughts because it will give you one of the most effortless user experiences. However, Ethereum has one major drawback―it is one of the most expensive networks you will find.
To make your experience more cost-efficient, Enjin will support JUMPNET in the future, which is a much cheaper option. Also, if you are already familiar with blockchain technology, you may choose Kovan Testnet for testing purposes, which is free to use.
Now that you have picked your blockchain technology for this project, let’s examine how to pay the fees for the initial placement of your NFTs.
3. Create NFT Wallets
Crypto wallets help you store cryptocurrencies that you can use for making payments in the crypto world, including fees for minting an NFT. MetaMask, AlphaWallet, MathWallet, Coinbase Wallet, and Trust Wallet are a few of the most widely used crypto wallets. When setting your wallet, you should make sure it is compatible with the blockchain technology you are using, which is ethereum in this project.
MetaMask is one of the most widely used wallets, and it is compatible with all significant ethereum-based projects, including OpenSea and Foundation. However, suppose you plan to explore the crypto world more in-depth in the future. You can also consider Coinbase Wallet because it supports non-Ethereum cryptocurrencies such as Bitcoin.
Here are the steps you can follow to set up your first MetaMask wallet for this project. Note that the setup process for Coinbase Wallet is also similar.
- Step 1. MetaMask wallet supports Chrome/Firefox extensions and apps for iOS and Android. First, you will need to install the extension for your browser or the app on your device.
- Step 2. You will need to configure your wallet with a username and password in the next step.
- Step 3. You will receive a random collection of 12 words known as “seed phrase” from your wallet provider as an added layer of security on top of the regular password protection. You will need this seed phrase when you set up the app or extension on a new device. It is imperative to keep the seed phase in a secured location. If you ever lose it, there is no way you can recover your account again.
- Step 4. After setting up, you will have an empty wallet. However, you will need some cryptocurrencies in your wallet to pay the fees. Enjin has its own crypto wallet. If you use Kovan Testnet as a testing environment, you will need to pay fees with test tokens, which are free to use.
Once you are done setting up your wallet, move on to choose the NFT market where you would sell your NFT.
4. Select Your NFT Marketplace
Again, you have several options from which to choose. A few of the popular NFT platforms are:
- OpenSea
- Axie Infinity Marketplace
- NBA Top Shot Marketplace
- Rarible
- SuperRare
- Foundation
- Nifty Gateway
- Larva Labs/CryptoPunks
- Mintable
- ThetaDrop.
When choosing your desired marketplace, keep in mind that some marketplaces focus on specific purposes, and some require particular cryptocurrencies. For example, NBA Top Shot is ideal for NFTs related to basketball, and Rarible requires you to use its own cryptocurrency, RARI. Typically, OpenSea, known as the Amazon of the NFT space, is a good choice due to its huge user base, great compatibility, and high monthly sales volume.
Afterward, you will have to connect the chosen marketplace to your digital wallet. Enjin provides great support to integrate its functionalities with your marketplace and wallet apps. Now, it’s time to proceed with the selling settings.
5. Upload Your Digital Item
The last step is to make your NFT available to the public for buying. Usually, your chosen marketplace will provide you with a step-by-step guide for the task. There are two main steps:
- Step 1. Upload your digital item (a PNG, GIF, MP3, or any other file type) to create a marketable NFT.
- Step 2. Decide how to monetize your NFT. There are typically three monetization options for you:
- Fixed price. You will set a certain price for your NFT, and the first person willing to buy it at that price can buy it.
- Timed auction. You can set a time limit for auctioneers to submit their final bid.
- Unlimited auction. You can control when to end the auction.
NFT marketplaces will charge you for selling and minting your NFTs. Each has its own cost structure, which can often get confusing. Before choosing the marketplace, carefully review the fixed and variable charges. If this sounds overwhelming, you can always consider Geniusee for outsourcing services.
Since we are done with the listing and minting process, let’s go through the steps for NFT implementation on Enjin.
How to Implement NFTs on Enjin
By now, we are familiar with our chosen NFT, wallet, marketplace, and blockchain technology. The last part is the implementation of the NFT within a project. We have several options from which to choose. Our final goal is to show all available NFTs to users. For this experiment, we have chosen Enjin as our project, which is compatible with ethereum.
Enjin has its own marketplace, which is an added advantage of using it for NFT implementation. Also, it allows us to integrate the functionalities within the mobile app.
Now comes the fun part—coding. You will explore how to implement our NFTs via SDK. It is a three-step process:
Add Dependency
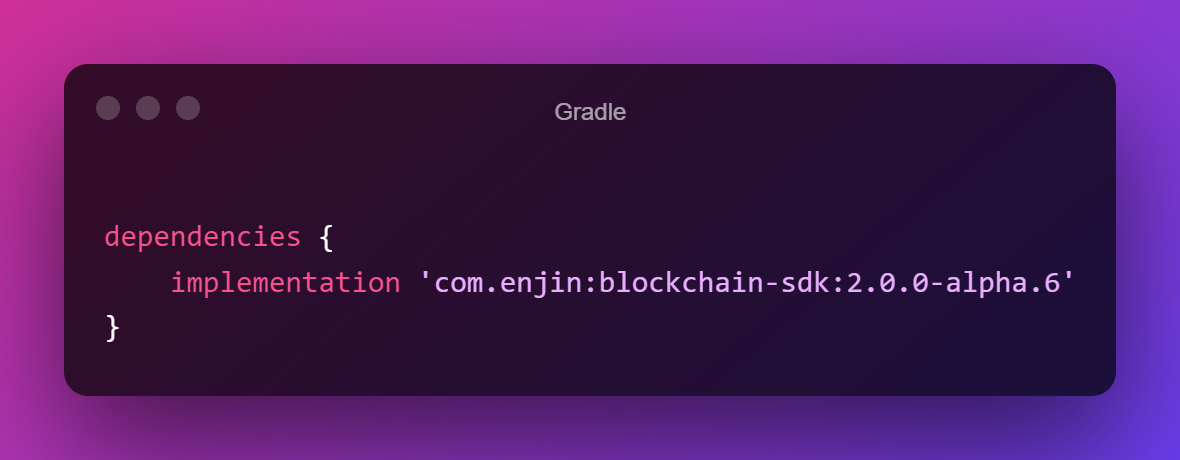
The first step is to add a dependency to your Gradle file. Make sure you check the latest version before the operation. When writing this article, the latest available version is 2.0.0-alpha.6.
Here’s how you can code the dependency:
Authenticate Project
Next, you will have to validate yourself as the project owner to allow the app to work with your project. You will need two confidential data for this operation—UUID and secret.
Authorization consists of two steps:
- Check graphQI response success, and
- Check app authentication.
Here’s what the coding looks like:
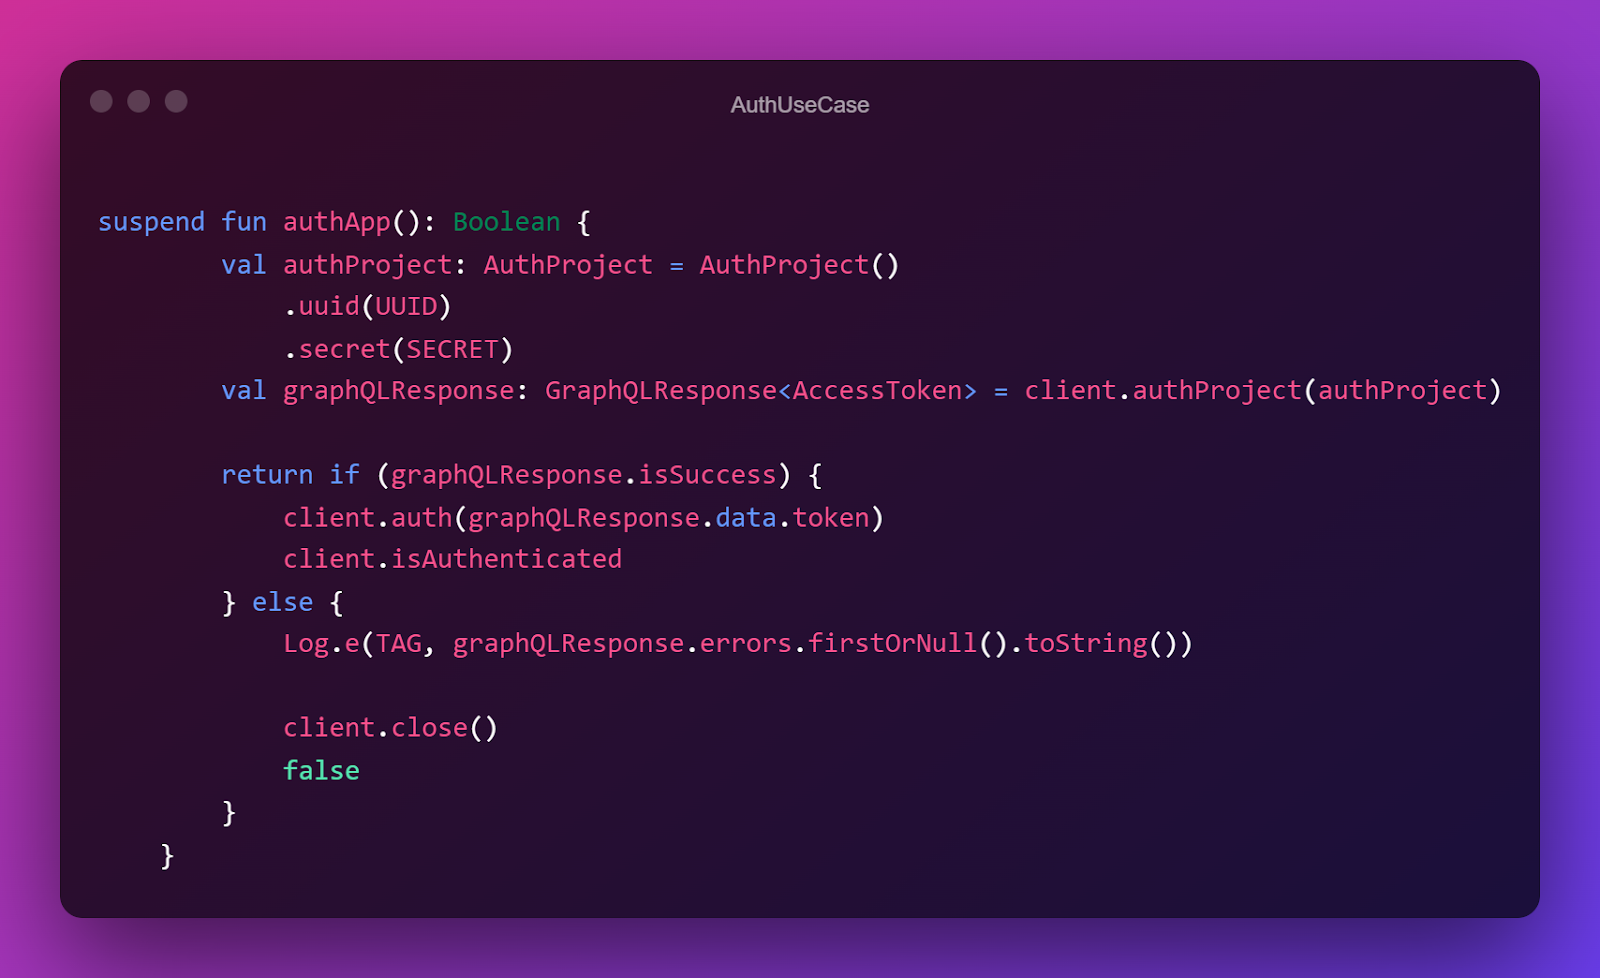
You can use the UseCase function in your ViewModel to view data on the UI and navigate users forward. At this point, make sure to use the client object as a singleton. Otherwise, you will have to authenticate every time you use it. So, the best way is to forward an Enjin client through dependency injection.
Get NFTs
We have come to the final step of NFT implementation. Enjin terms all NFTs as an asset. You will find all information related to the asset on the official documentation. We will use metadataUri(image) and meltValue(price).
getAllAssetsRequest: A request parameter where we specify which of the asset’s data we want to get.
mapAssets: The function that maps the asset to a UI entity.
Here’s the code:
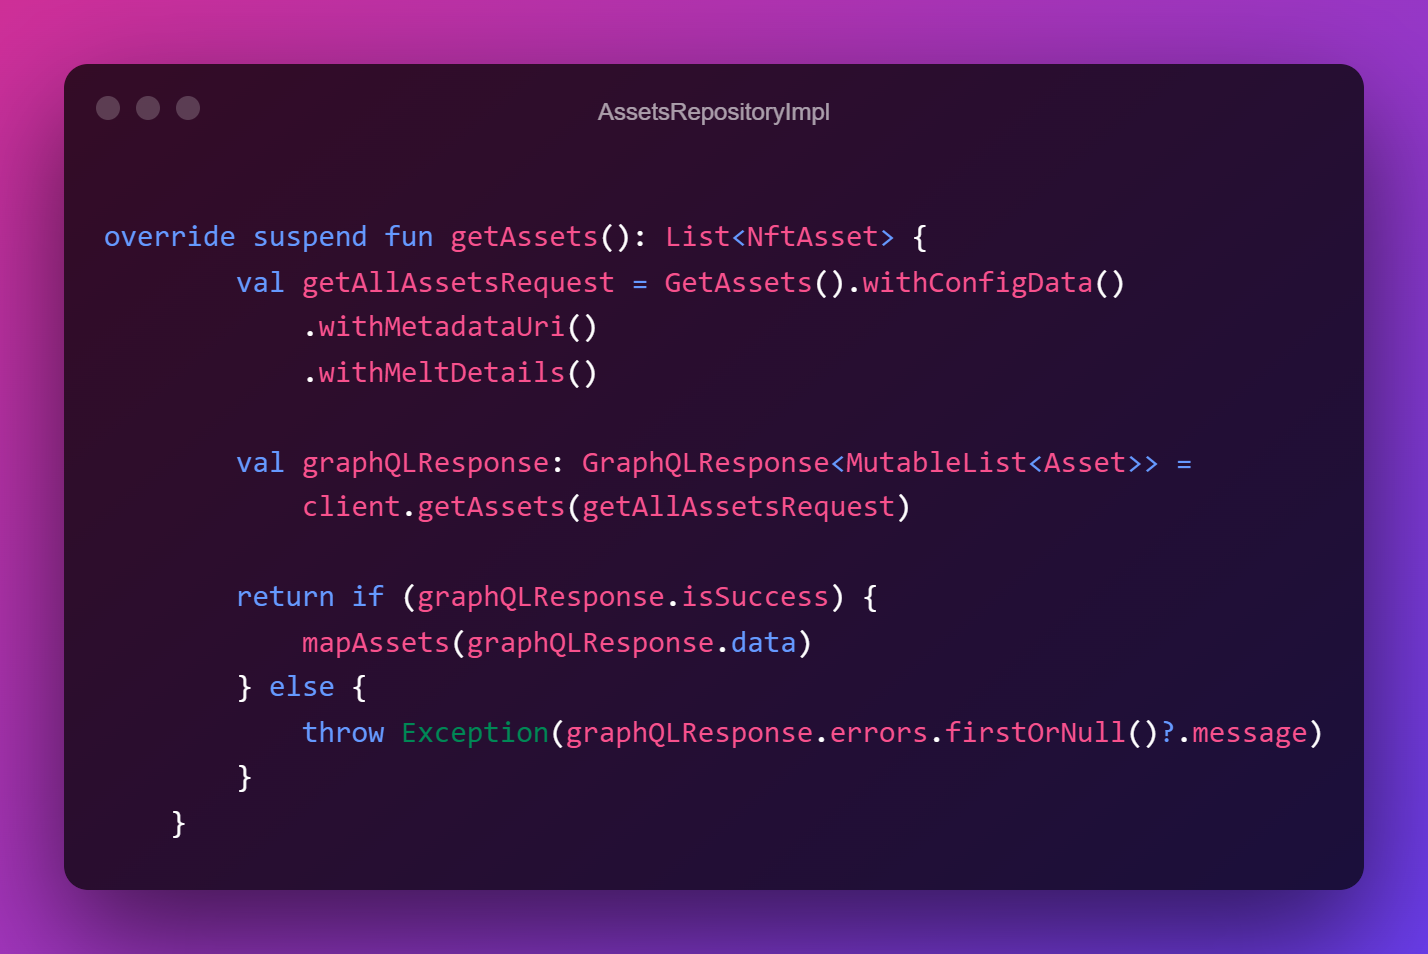
There is one problem with this method, however. An asset does not have an image URL; rather, it only has a URL to JSON. You can address this problem with an additional retrofit request. You can request any of the required fields of the asset.
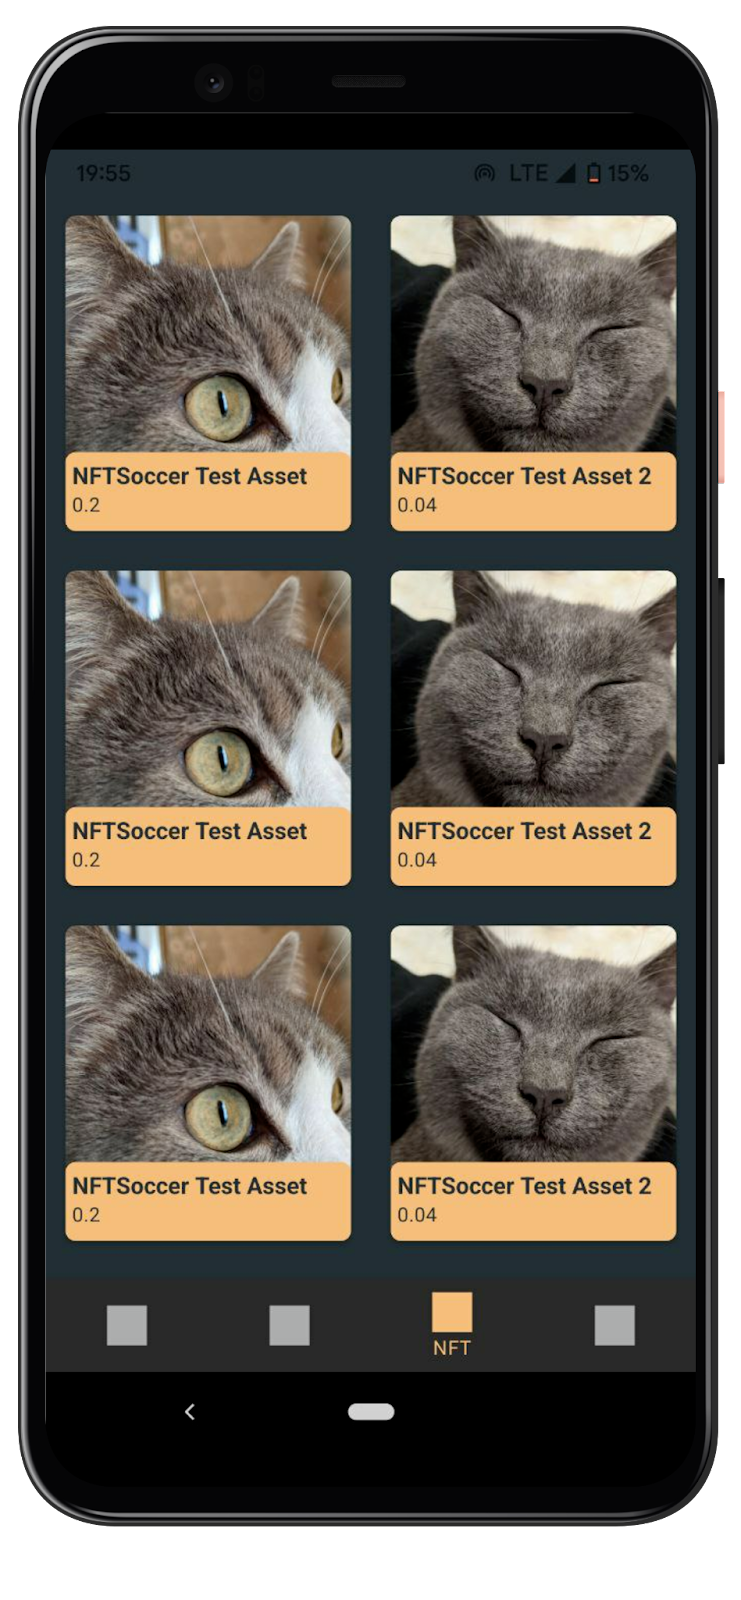
After we are done with coding, here’s what our test NFT would look like:
Summary
So, now you see that creating and implementing NFTs in your mobile app is easy and fun! You can show all your NFTs to users. Enjin offers many functionalities as an NFT marketplace. At the same time, you can integrate Enjin’s functionalities into your apps. If you are confused or have any questions, reach out to Geniusee for any outsourcing services. The team of experts will be happy to consult with you!