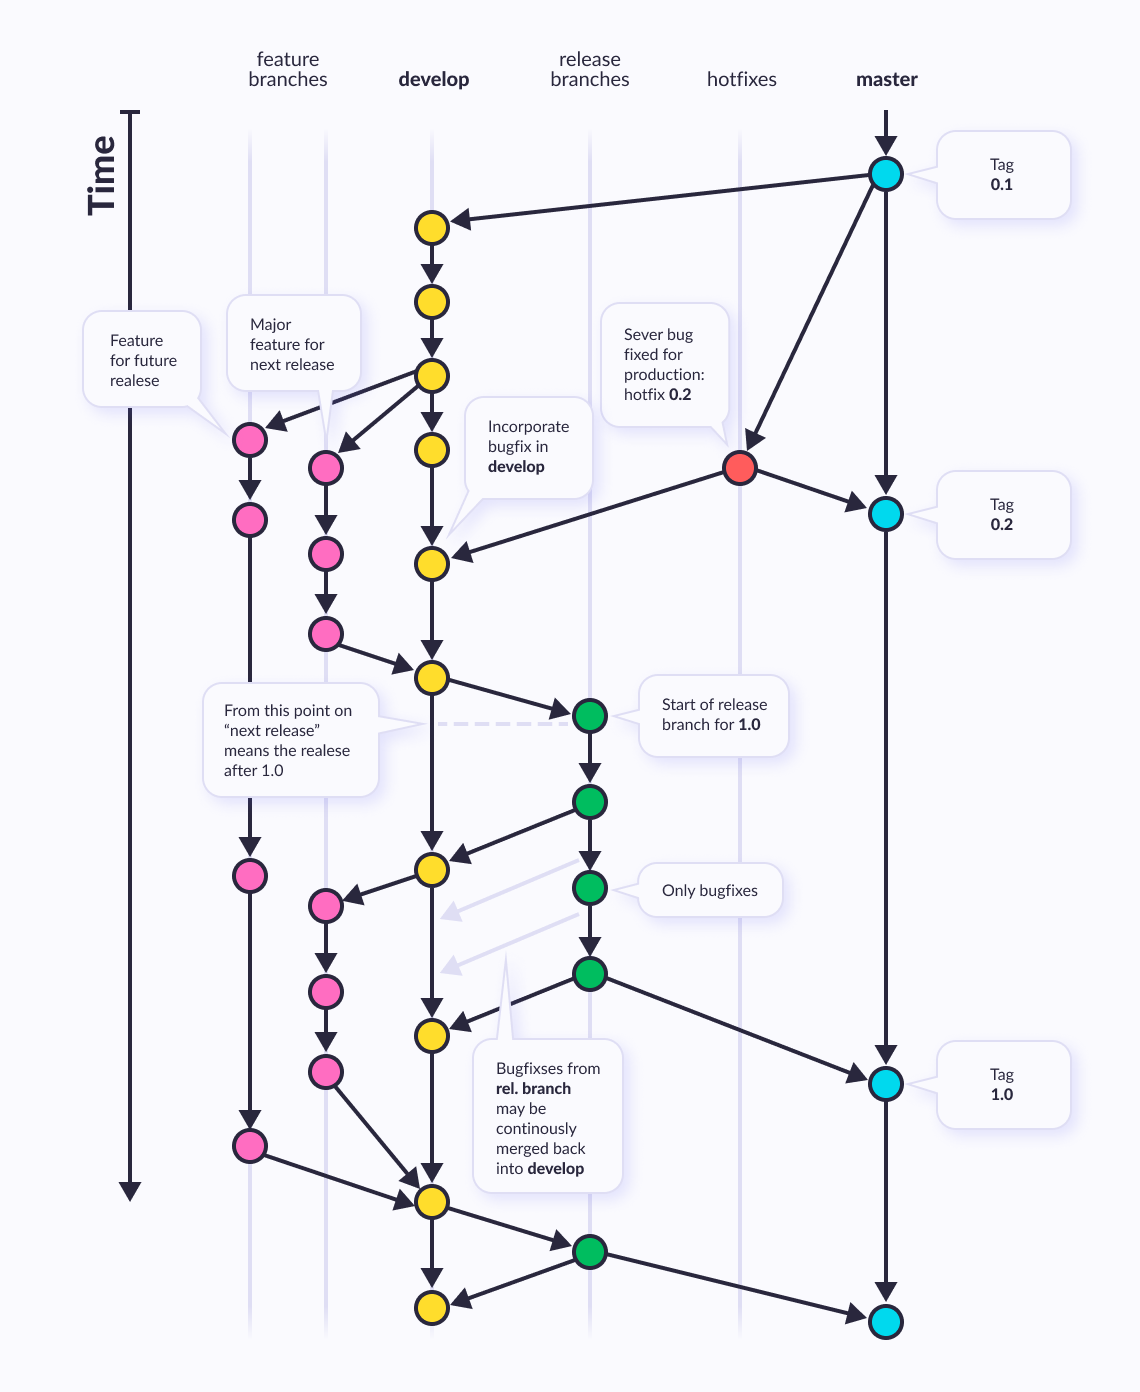
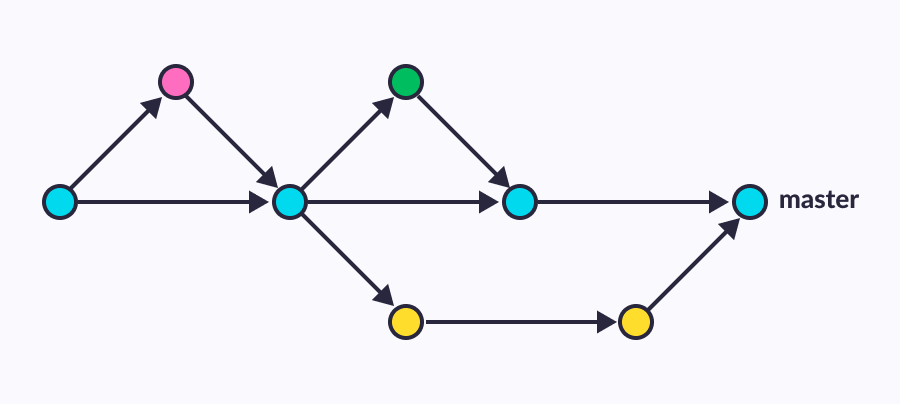
In this article, we'll look at the Git branch model called git flow. The model was proposed by Vincent Driessen in his article “A successful Git branching model” and is used in various variations. The Git flow defines a strict branching model designed around the project release. This provides a robust framework for managing larger projects. The general diagram of the git branching model is as follows:
Gitflow uses its own git-flow toolkit that integrates seamlessly with Git, adding new Git commands.
Gitflow is ideally suited for projects that have a scheduled release cycle. This workflow doesn’t add any new concepts or commands beyond what’s required for the Feature Branch Workflow. Instead, it assigns very specific roles to different branches and defines how and when they should interact. In addition to feature branches, it uses individual branches for preparing, maintaining, and recording releases. Of course, you also get to leverage all the benefits of the Feature Branch Workflow: pull requests, isolated experiments, and more efficient collaboration.
We want to make your Git development cycle easier and so we’re excited to announce a new support tutorial for your team’s branching workflow.
In this article:
What Is Git Flow Model Initialization
Instead of a single master branch, this workflow uses two branches to record the history of the project. The master branch stores the official release history, and the develop branch serves as an integration branch for features. It's also convenient to tag all commits in the master branch with a version number.
1. Open terminal or command line and go to your project directory (It must be initialized with git).
2. Run git flow init
It will ask some questions about the different branches’ naming structure. Please write answers like below.
- Branch name for production releases: master
- Branch name for development: develop/stage/sandbox
- Feature branches?: -short-description
- Bugfix branches?: -fux-bug/-fix-issue-short-description
- Hotfix branches?: -hotfix-short-description
Let us dwell on the names of branches.
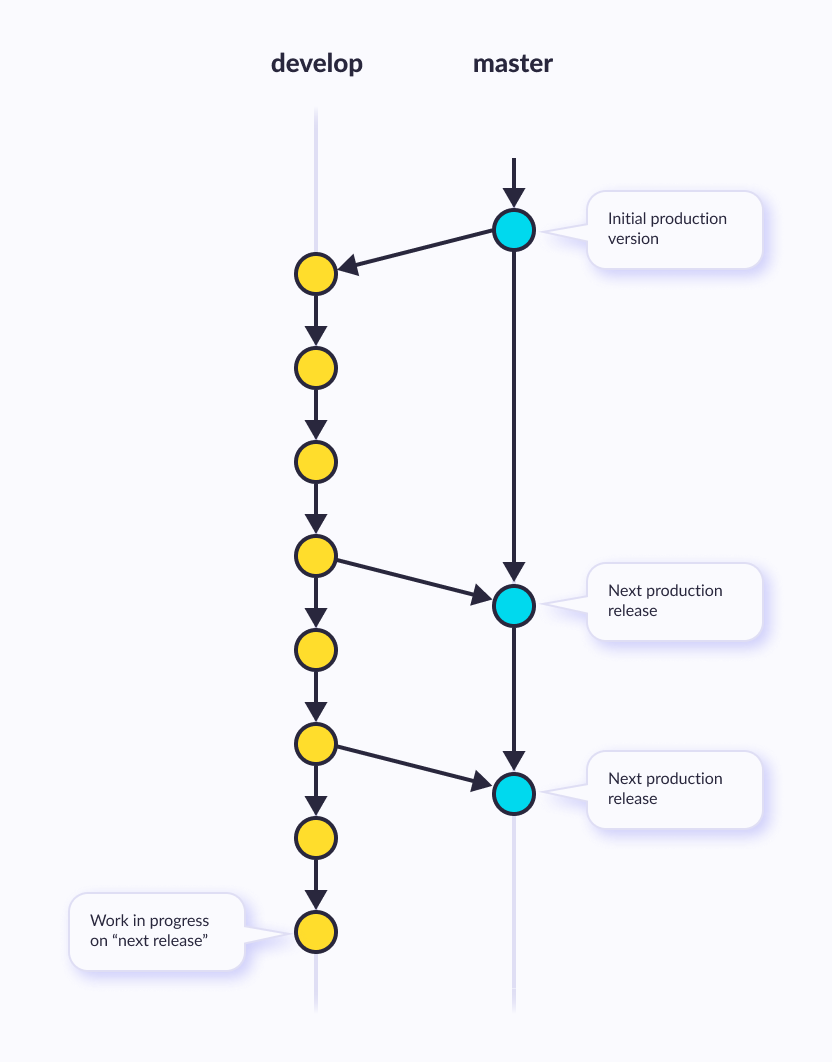
At the core, the develop git flow branching model is greatly inspired by existing git models out there. The central repo holds two main git flow branches with an infinite lifetime:
- master
- develop
The master branch at origin should be familiar to every Git user. Parallel to the master branch, another branch exists called develop.
We consider origin/master to be the main branch where the source code of HEAD always reflects a production-ready state.
We consider origin/develop to be the main branch where the source code of HEAD always reflects a state with the latest delivered develop changes for the next release. Some would call this the “integration branch”. This is where any automatic nightly builds are built from.
When the source code in the develop branch reaches a stable point and is ready to be released, all of the changes should be merged back into master somehow and then tagged with a release number. How this is done in detail will be discussed further on.
Therefore, each time when changes are merged back into master, this is a new production release by definition. We tend to be very strict at this so that theoretically, we could use a Git hook script to automatically build and roll-out our software to our production servers every s time there was commit on master.
Supporting Branches
Next to the main branches master and develop, our develop git flow model uses a variety of supporting branches to aid parallel development between team members, ease git flow tracking of features, prepare for production releases and to assist in quickly fixing live production problems. Unlike the main branches, these git flow support branches always have a limited lifetime, since they will be removed eventually.
The different types of branches we may use are:
- Feature branches
- Release branches
- Hotfix branches
Each of these branches has a specific purpose and are bound to strict rules as to which branches may be their originating branch and which branches must be their merge targets. We will walk through them in a minute.
By no means are these branches “special” from a technical perspective. The branch types are categorized by how we use them. They are of course plain old Git branches.
Feature Branches
May branch off from:
master
Must merge back into:
develop and master
Branch naming convention:
hotfix-*
Hotfix branches are very much like release branches in that they are also meant to prepare for a new production release, albeit unplanned. They arise from the necessity to act immediately upon an undesired state of a live production version. When a critical bug in a production version must be resolved immediately, a hotfix branch may be branched off from the corresponding tag on the master branch that marks the production version.
The essence is that the work of team members (on the develop branch) can continue, while another person is preparing a quick production fix.
Creating The Hotfix Branch
Hotfix branches are created from the master branch. For example, say version 1.2 is the current production release running live and causing troubles due to a severe bug. But changes in development are yet unstable. We may then branch off a hotfix branch and start fixing the problem:
$ git checkout master
$ git pull
$ git checkout -b hotfix-1.2.1
Switched to a new branch "hotfix-1.2.1"
$ ./bump-version.sh 1.2.1
Files modified successfully, version bumped to 1.2.1.
$ git commit -a -m "Bumped version number to 1.2.1"
[hotfix-1.2.1 41e61bb] Bumped version number to 1.2.1
1 files changed, 1 insertions(+), 1 deletions(-)
Don’t forget to bump the version number after branching off!
Then, fix the bug and commit the fix in one or more separate commits.
$ git commit -m "Fixed severe production problem"
[hotfix-1.2.1 abbe5d6] Fixed severe production problem
5 files changed, 32 insertions(+), 17 deletions(-)
Finishing A Hotfix Branch
When finished, the bugfix needs to be merged back into master, but also needs to be merged back into develop, in order to safeguard that the bugfix is included in the next release as well. This is completely similar to how release branches are finished.
First, update master and tag the release.
$ git checkout master
$ git checkout pull
Switched to branch 'master'
$ git merge --no-ff hotfix-1.2.1
Merge made by recursive.
(Summary of changes)
$ git tag -a 1.2.1
Edit: You might as well want to use the -s or -u flags to sign your tag cryptographically.
Next, include the bugfix in develop, too:
$ git checkout develop
$ git checkout pull
Switched to branch 'develop'
$ git merge --no-ff hotfix-1.2.1
Merge made by recursive.
(Summary of changes)
The one exception to the rule here is that, when a release branch currently exists, the hotfix changes need to be merged into that release branch, instead of develop. Back-merging the bugfix into the release branch will eventually result in the bugfix being merged into develop too when the release branch is finished. (If work in develop immediately requires this bugfix and cannot wait for the release branch to be finished, you may safely merge the bugfix into develop now already as well.)
Finally, remove the temporary branch:
$ git branch -d hotfix-1.2.1
Deleted branch hotfix-1.2.1 (was abbe5d6).
.Gitignore File
git add git commit git diff git stash .gitignore
Git sees every file in your working copy as one of three things:
1. tracked - a file which has been previously staged or committed; 2. untracked - a file which has not been staged or committed; or 3. ignored - a file that Git has been explicitly told to ignore.
Ignored files are usually built artifacts and machine-generated files that can be derived from your repository source or should otherwise not be committed. Some common git flow examples are:
- dependency caches, such as the contents of /node_modules or /packages
- compiled code, such as .o, .pyc, and .class files
- build output directories, such as /bin, /out, or /target
- files generated at runtime, such as .log, .lock, or .tmp
- hidden system files, such as .DS_Store or Thumbs.db
- personal IDE config files, such as .idea/workspace.xml
Ignored files are tracked in a special file named .gitignore that is checked in at the root of your git repository. There is no explicit git ignore command: instead, the .gitignore file must be edited and committed by hand when you have new files that you wish to ignore. .gitignore files contain github flow patterns that are matched against file names in your repository to determine whether or not they should be ignored.

By the way...
Apache Airflow: the full guide
Automate your workflow and boost performance with Apache Airflow. We offer you a full guide to fill all gaps in your data ecosystem
Let's seeGit Ignore Patterns
.gitignore uses globbing patterns to match against file names. You can construct your patterns using various symbols:
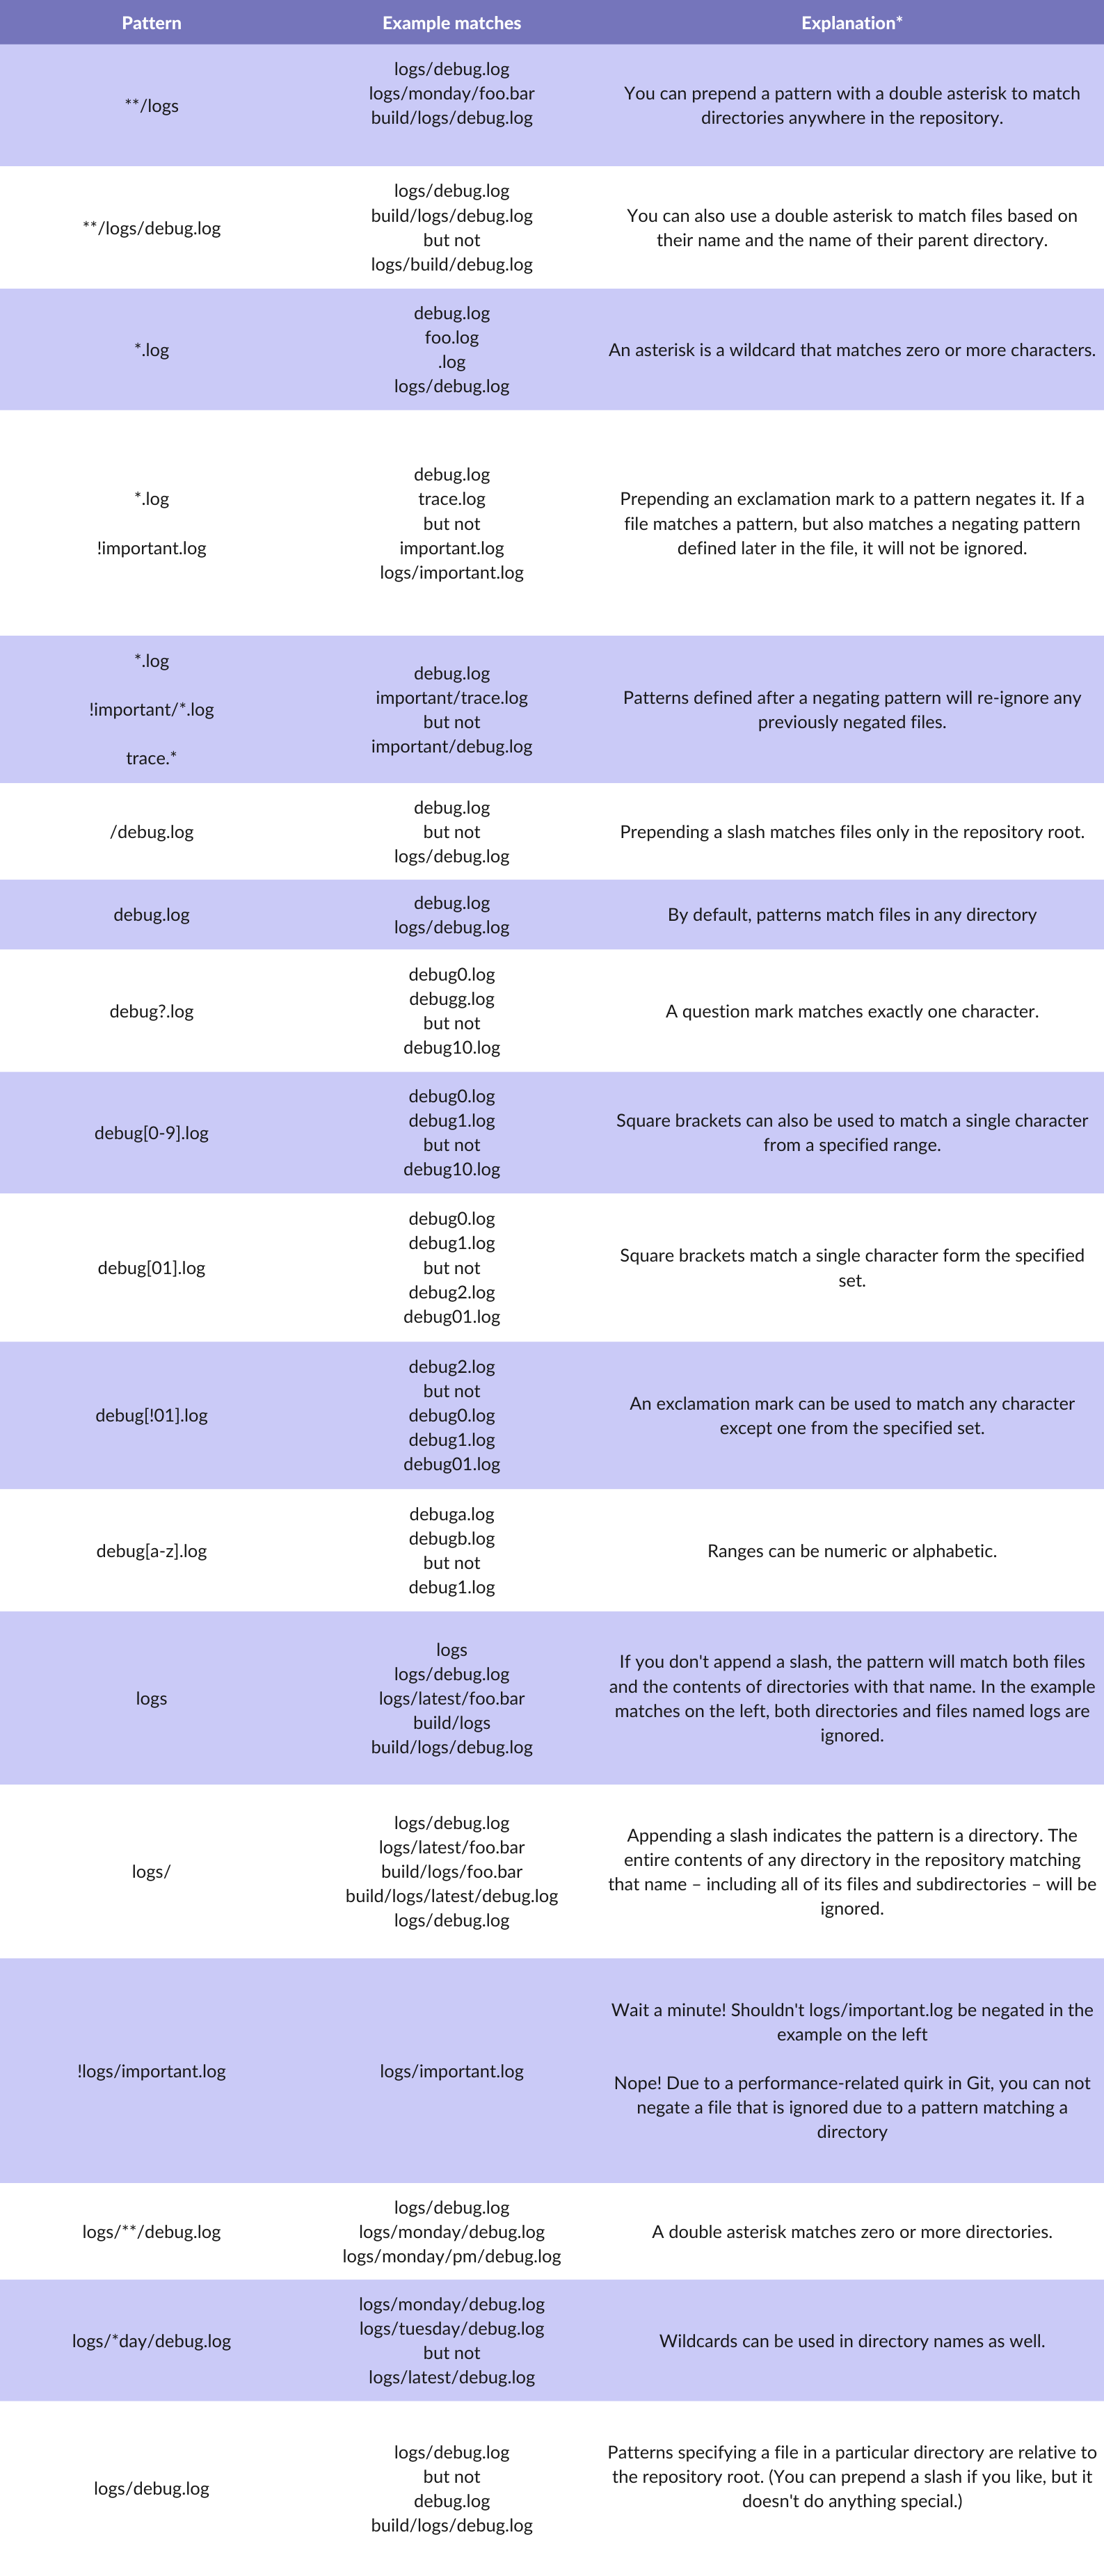
In addition to these characters, you can use # to include comments in your .gitignore file:
# ignore all logs
*.log
You can use \ to escape .gitignore pattern characters if you have files or directories containing them:
# ignore the file literally named foo[01].txt
Foo\[01\].txt
Other Git branching strategies
Before we talk about best practices, let's understand the worst practices and anti-patterns when working with any branch strategy. So you could choose the best git branching model for your team.
Branching & merging anti-patterns:
Merge Paranoia - when developers are afraid to merge code, due to the consequences that may arise (merge conflicts), therefore, the negative effect of delayed integration accumulates.
Merge Mania - when developers spend more time merging changes than developing.
Big Bang Merge - Branches are not merged, resulting in one giant merge at the end.
Never-Ending Merge - continuous merging, as there is always something to merge.
Wrong Way Merge - Merging a later branch with an earlier version.
Branch Mania is the creation of a large number of branches for no apparent reason.
Cascading Branches - creating branches without merging them into the mainline at the end of development.
Mysterious Branches - creating a branch for no reason.
Temporary Branches - creating a branch with a changing reason for its existence: the branch becomes a "permanent temporary workspac".
Volatile Branches - Starting a branch in an unstable state or pushing unstable changes to other branches.
Development Freeze - Stopping all development for branching, merging, or releasing.
Berlin Wall - using branches to separate people in a team, instead of dividing them into tasks / features they work on.
GitHub Flow
It looks almost the same as Git Flow, but there is only one fixed branch - master; everything else belongs to thematic branches. Thematic branches, in turn, are created in forks - cloned copies of the repository. That is, the central repository of thematic branches does not contain. Including after the merge, since the labels of the branches are removed and their heads become anonymous.
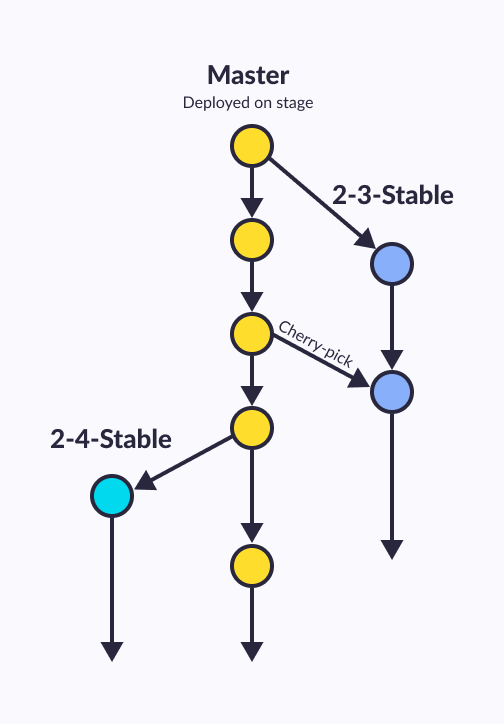
GitLab Flow
As in GitHub Flow, there is only one fixed branch - master, everything else belongs to thematic branches. However, if in that case the releases were placed in master-a commits, then a separate branch is created for each release. Moreover, no merging of these branches with parent is performed. If a branch is branched, then it will live its own life, receiving bug fixes in the form of separate commits (possibly ported from head/master, taking into account the accumulated difference in functionality between branches).
Environment branches in GitLab flow
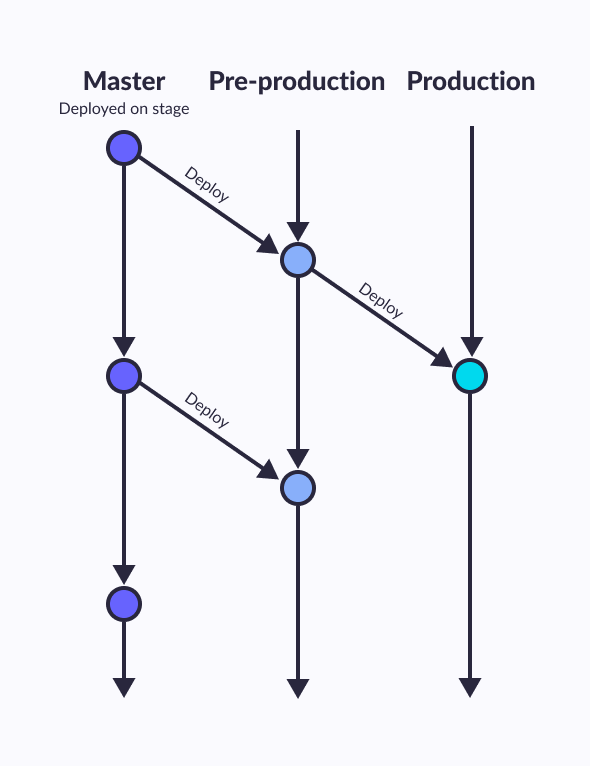
Release branches in GitLab flow
Trunk-based software development
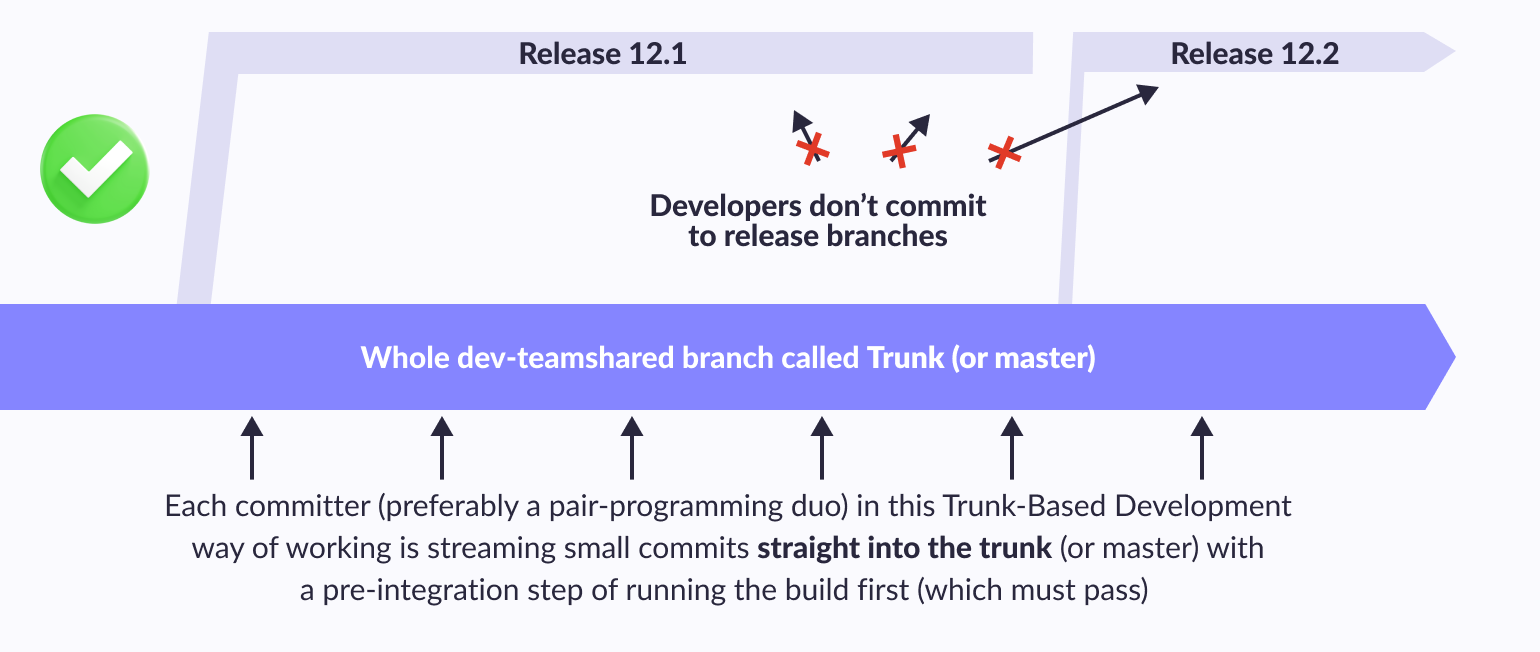
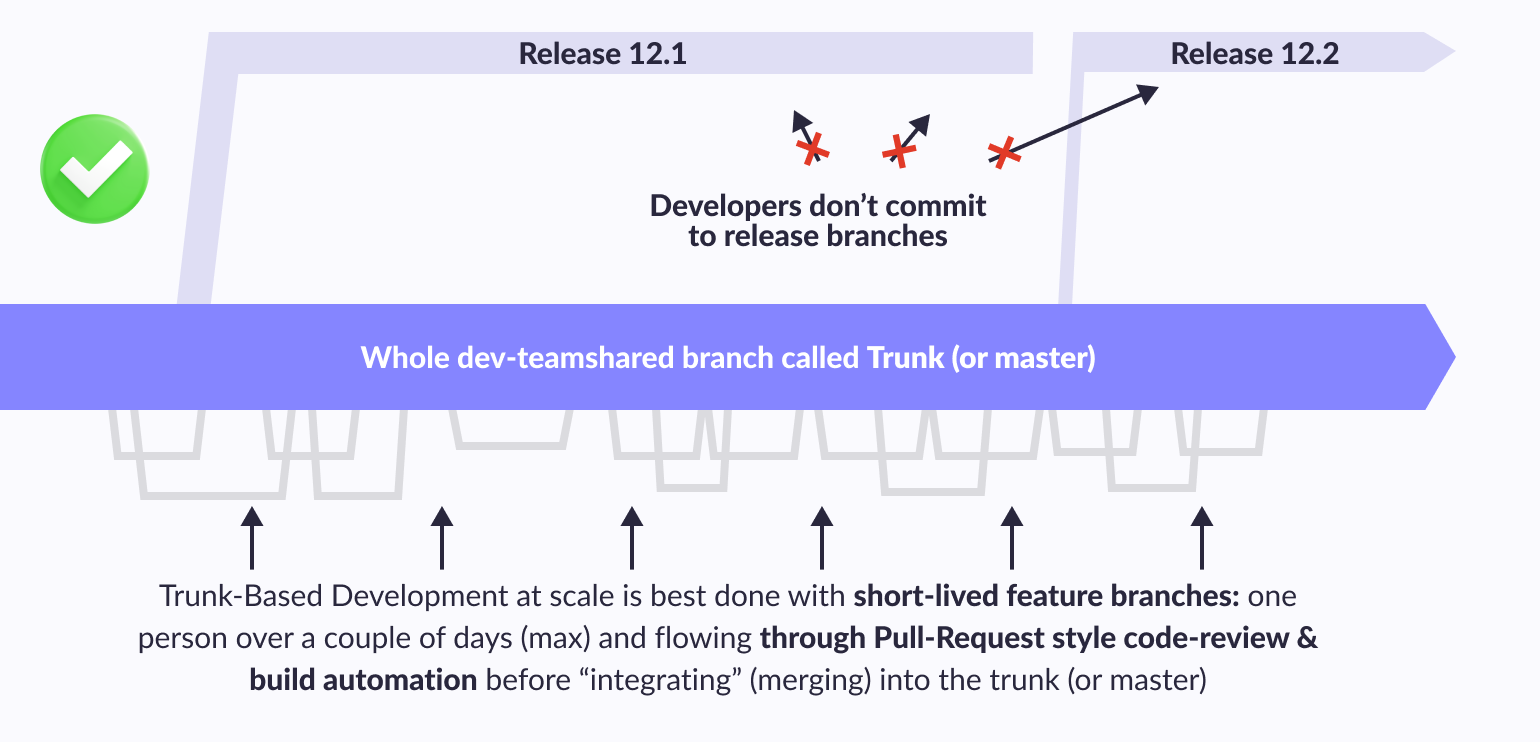
It is based on a branching model in which developers collaborate on code on a single branch, called the “master” (or master in Git terminology). At the same time, minor feature branches can also be created, but they have a short lifespan. This approach is firmly established along with other documented development practices in long-term branches and allows developers to avoid the complexities of merging branches. The phrase “main branch” (from the English “trunk” - trunk) carries the idea of a growing tree, in which the thickest and longest part is precisely the trunk, and not the branches that diverge from it and have a more limited length.
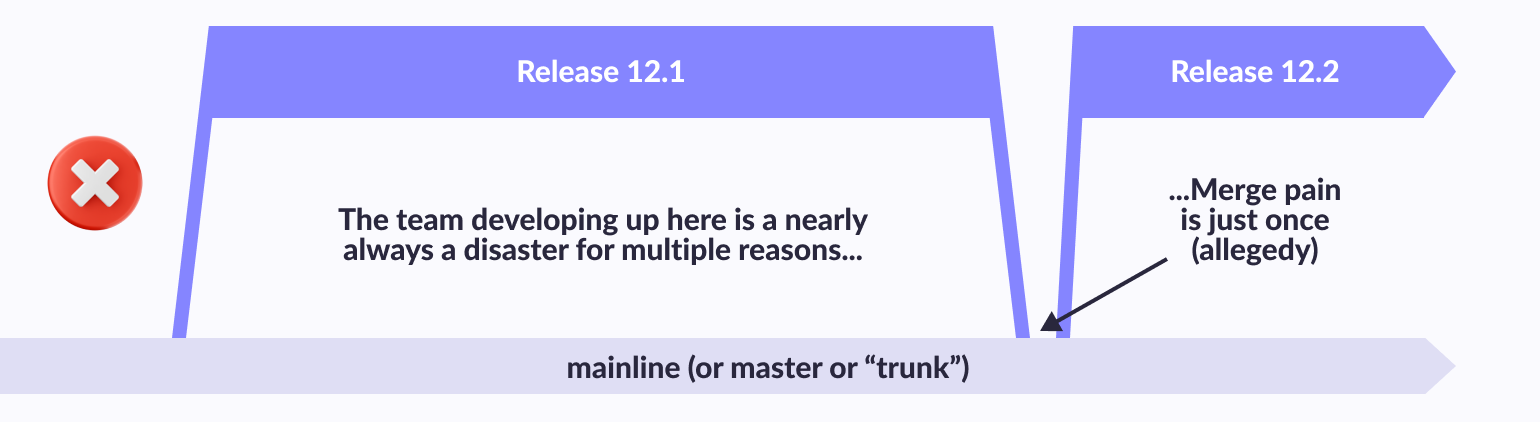
Shared branches off mainline/master/trunk are bad at any release cadence:
Trunk-Based Development For Smaller Teams:
Scaled Trunk-Based Development:
Branch By Abstraction
Trunk Based Development suggests instead of creating a branch for features, create a branch to change one abstraction.
Let's imagine that we have a Car object that has an abstraction of "front wheels" and "rear wheels" that we want to replace with a different type of wheel. In the case of a feature branch, we would develop an implementation of a new wheel type in 1 branch, with Branch By Abstraction, everything is a little more complicated.
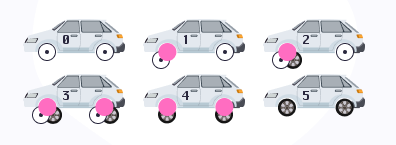
Consider the figure and the steps that will help us to reveal the procedure for the TBD approach
We create a branch, wrap the front wheel in an abstraction, send a Pull Request, merge
We create a branch, describe a new type of front wheels and add a feature flag for switching wheel types, send a Pull Request, merge
We create a branch, wrap the rear wheel into an abstraction, send a Pull Request, merge
We create a branch, describe a new type of rear wheels and add a feature flag for switching wheel types, send a Pull Request, merge
Included in the sale of a new type of wheels, made sure that everything is OK
Removing old wheels with separate Pull Requests
And what did it give us?
- Frequent integrations! We have already come to the conclusion that you need to often integrate small pieces of code (Continuous Integration), now with this approach you can do "micro-pieces".
- Gradual code change/refactoring. Instead of reworking everything at once, we change gradually, fumbling for changes before we finish the big task.
- Ability to switch to other features. In the event that we need to switch to another task, we can merge the last changes and return to refinement later.
Continuous Code Review
We review other people's pull requests immediately after submitting our own. Because of this, pull requests are small (change of one abstraction), their review takes no more than a couple of minutes. If it took 10 minutes from the creation of the pull request to the approval, then this is an acceptable result, if more than 1 hour, then this is considered a very bad result .
What gives us the concept of Continuous Code Review
- Sharing knowledge. Everyone understands how the service is changing, reuse the code, suggest best practices to each other.
- Reducing those debts due to the fact that we all refract on the go.
- Deployment acceleration. (a pull request weighs not a couple of days, but several minutes and can immediately be sent to the production)
Git Branching Pros and Cons
Pros
Git Flow is used by many distributed teams, including open source teams, that have different skill levels. Project maintainers can do code review and approve each line of code for release.
Git Flow fits well with the "traditional release model" where releases are made once a month or once every couple of weeks.
Git Flow also works well when working with an installed product or multiple versions in production.
Cons
Git Flow can slow things down when you have to review large pull requests when you're trying to iterate quickly.
Releases are difficult to do more than once a week.
Large functions can spend days merging and resolving conflicts and force multiple test cycles.
The project history in the git has a bunch of merge commits and makes it hard to see the real work.
May be problematic in Continuous Integration/Continuous Delivery scenarios.

Related topic
SCRUM: All You Need To Know In Simple Terms
Are you still unsure about some terms or details regarding SCRUM? Our experts created the article that will explain everything in simple words
Dive inOur Experience
To organize development team work on a project, we use the Git file version control system. Using Git has several advantages over other ways of organizing collaboration:
- saving a complete history of file changes with the ability to revert to previous versions
- synchronization of changes between the team and automatic merging of changes
- the ability to work with large binary files
Git is a distributed system and each developer or designer has their own local repository (repository). Synchronization between local repositories is carried out through a central "shared" repository, which we place on a dedicated machine (server). The server can be accessed via the SSH protocol. We suggest using this type of cooperation between team members.
Typical Workflow:
1. As you work, files are created, modified, or deleted in local repositories.
2. Upon completion of a certain logical stage of work, it becomes necessary to commit changes (commit) and / or synchronize with colleagues.
3. Preparation of files for commit is carried out - accounting of changed, new and deleted files, as well as reset of changes.
4. The commit is in progress.
5. Local changes are uploaded to the shared repository and made available to colleagues.
Summary
Your local code bases should always be relevant at the time of creating the merge or development branch, as well as creating a pull request for the admin.